
Gold isn’t just used to make pretty jewelry. It is a highly versatile reagent used in a wide variety of applications. One important application of gold is for protein and antibody bioconjugation. Gold has been conjugated to a range of proteins such as antibodies, protein A, lectins, enzymes, toxins, and many others. This article discusses methods for protein and antibody bioconjugation to gold. These include…
Methods for protein and antibody bioconjugation to gold include passive non-covalent coupling, ionic coupling, coupling via thiol-maleimide chemistry, streptavidin-biotin interactions, and via amide bond formation.
We’ve also discussed how to label proteins with fluorescent probes instead of gold in our articles.
Applications of Protein- and Antibody- Gold Bioconjugates
Since the early 90s, gold-protein bioconjugates have seen significant research into their applications. The technology and understanding of these bioconjugates have developed considerably in the last 30 years, opening up applications in many fields, particularly in biomedical science.
Applications of gold bioconjugates include gold staining for electron microscopy, biological assays, and biosensors.
Gold Staining for Electron Microscopy
Gold is an excellent material for electron microscopy because of its high electron density which allows it to produce high contrast images (to learn more about gold in microscopy check out this article from Fourie et al.). Once a protein is bioconjugated to gold, the gold acts as a stain, giving much better imaging of the target protein. Electron microscopy using gold bioconjugates has been studied most extensively for the immune system in the field of immunohistochemistry. Interestingly, by staining with gold particles of different sizes, multiple objects can be labeled in a single sample.
Gold Bioconjugate Bioassays
Gold bioconjugates are now used in a wide range of bioassays because of their excellent ability to bind to specific proteins and their widely adjustable optical and surface properties. Versatility allows gold bioconjugates to be modified to fit specific experimental conditions with high precision. Depending on the configuration of the assay, the type of gold conjugate, and the target protein, potentially thousands of proteins can be assayed in parallel and assessed for their various interactions. Gasparyan et al. describe the use of gold bioconjugates in immunoagglutination and DNA hybridization in their review here.
Related articles:
- Immunoprecipitation can also be utilized for some bioassays as an alternative to gold conjugate based bioassays. However, it’s a much more involved and tedious technique.
Gold Biosensors
Extending from their incredible versatility in bioassays, the use of gold bioconjugates as biosensors has been explored in extensive detail. The flexible optical properties of gold nanoparticles make them excellent optical biosensors once bound to a target protein. Other gold-based biosensors use gold’s electrochemical or piezoelectric properties to create biosensors for specific proteins. Historically, even radioactive gold particles have been used in biosensing, although the use of such bioconjugates has seen a significant decline for obvious reasons.
Gold biosensors provide several advantages compared to traditional techniques such as ELISAs – they can provide constant time-series information, used without taking time points, and assays are much cheaper after the initial biosensors have been developed. Gold nanoparticle biosensors are described in detail in this review article.
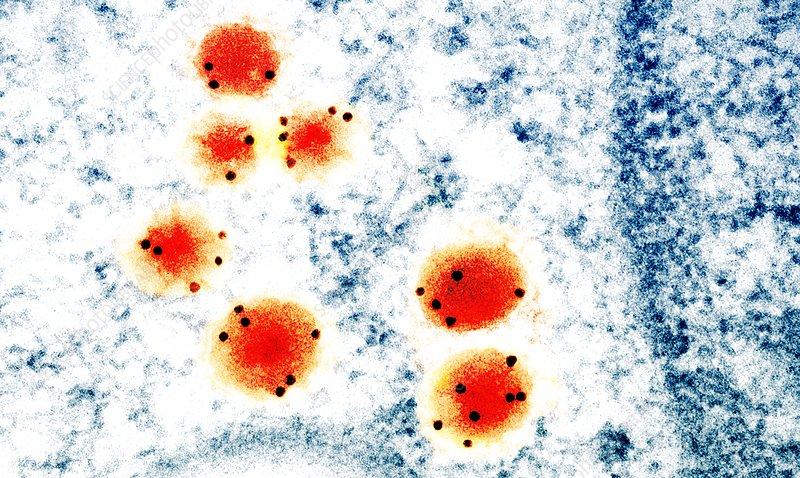
Antibody bioconjugation to gold allows scientists to explore biological phenomenon using TEM using gold’s optical properties. Here’s an example of immune-gold labeling. TEM image of antibodies (orange) marked with gold particles (black dots) (source).
How Does Gold Bioconjugate to a Protein?
The bioconjugation of gold to a protein occurs through highly complex mechanisms which often vary depending on the type of gold, the functionalization of the gold, the target protein, and the local chemistry. While this seems overwhelming, these complex mechanisms can be simplified into two general types.
Types of protein bioconjugation to gold can be classified into two general types: passive conjugation which involves non-covalent interactions and covalent conjugation.
Type 1. Passive Bioconjugation of a Protein to Gold
Passive conjugation is the traditional method of conjugating gold to a protein. The interaction occurs passively between the protein and the gold particle through van der Waals and ionic forces. Depending on the conditions, a protein can spontaneously conjugate with a gold particle. By varying the size of the particle, and its ratio to the protein present, the conjugate can potentially bind multiple proteins to a single gold particle or surface.
Passive conjugation is useful because it’s a quick and easy way to produce a functional protein conjugate. However, it isn’t perfect. Passive conjugates often lack long-term stability and require very specific conditions for each protein used or conjugation may not occur. Worse, as conditions change, passively conjugated proteins can detach from the gold if the conditions in the experiment change.
Type 2. Covalent Conjugation of a Protein to Gold
It’s important to have a sensitive and stable conjugate that doesn’t decouple when the experimental conditions change. By covalently reacting your protein with gold particles, a significantly more stable gold bioconjugate can be formed. This allows for more complex experiments to be performed and potentially harsher conditions to be used.
Covalent conjugation is achieved by using functionalized gold particles. These groups cross-link the protein to the gold creating a strong bond. However, covalent conjugation is usually a more involved process requiring a higher investment of time and money. Additionally, it requires pre-functionalized gold particles that you can react with.
For other protein conjugation chemistry methods, take a look at our article.
You may also like our article on methionine selective bioconjugation.
Methods for Antibody Bioconjugation to Gold Nanoparticles
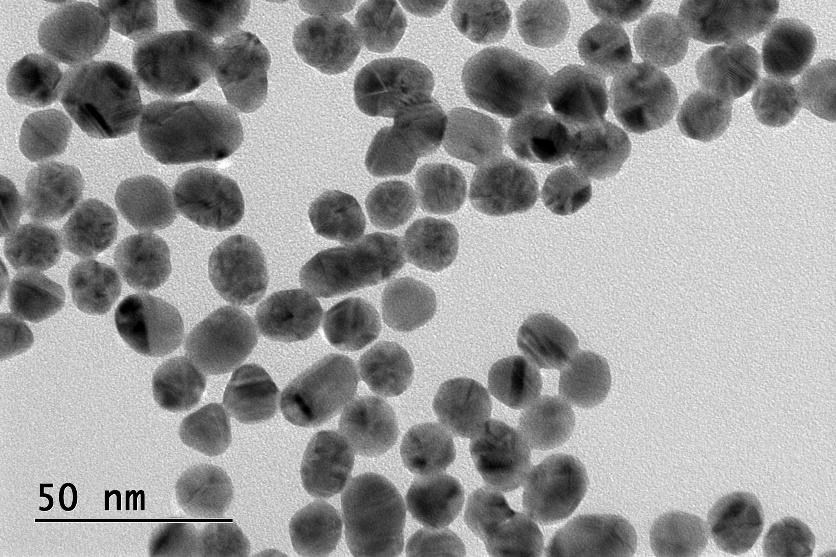
Gold nanoparticles are an important type of metallic gold that is commonly used for bioconjugation with antibodies in immune system studies. Gold nanoparticles are metallic gold structures that are roughly 1 to 100 nm in size. Their outer layer can be customized to provide the desired functionality.
Methods for antibody bioconjugation to gold nanoparticles include passive conjugation in water and EDC/NHS covalent conjugation.
Method 1. Passive Antibody Conjugation to Gold Nanoparticles:
As mentioned above, passive conjugation is a straightforward and easy technique to conjugate proteins to gold. This applies to antibodies and gold nanoparticles too. Here’s a step-by-step example of how to conjugate antibodies to gold nanoparticles based on the nanoComposix BioReady gold nanospheres:
Step 1. Gather your Starting Materials including Gold Nanoparticles, Antibodies, Clean Sample Tubes, and DI water.
Collect the appropriate gold nanoparticles, your target antibody, and sample tubes to perform the reaction in. You’ll need access to DI water. The nanoparticles should be suspended in DI water and the antibodies should be free of additional proteins or salt additives.
Step 2. Mix the Antibodies with the Gold Nanoparticles in DI Water.
Aliquot your gold nanoparticles into a sample tube. Rapidly add your purified antibodies to the gold nanoparticle solution and cover the sample tube.
Step 3. Incubate the Sample while Conjugation Occurs.
The conjugation reaction is quick but not instantaneous. Allow your sample to incubate at room temperature for 30 minutes or so with gentle stirring/rotating.
Step 4. Centrifuge the Sample and Collect the Conjugate.
Your sample needs to be centrifuged at 3500 RCF for 10 minutes. After, carefully remove the supernatant. Resuspend your conjugate in DI water.
Step 5. Store your sample at 4°C / 39.2°F
Your sample needs to be stored at low temperatures to ensure it lasts as long as possible before decoupling. However, do not freeze your conjugate as this can cause the sample to decompose.
Method 2. Covalent Conjugation of an Antibody to Gold Nanoparticles Using an NHS Ester Reaction.
Biomedical and nanomaterial suppliers often provide ready-made kits for performing protein conjugations to gold. These typically use EDC and NHS reactive groups to active carboxyl groups on activated gold nanoparticles which then couple to the protein. Stratech offers a kit that used carboxyl-activated gold nanoparticles to couple with antibodies using EDC/NHS chemistry. Here’s a step-by-step example of that process:
Step 1. Gather your materials: Carboxyl-activated gold nanoparticles, the target antibody, the conjugation reagent (EDC/NHS), buffer solutions, and suitable clean glassware.
Again, the antibody to be conjugated must be free of contaminants such as salts or other proteins. Make sure your glassware is clean and has been rinsed with DI water.
Step 2. Prepare the conjugation reagent.
Prepare the conjugation reagent in a buffer solution to ensure its stability. It should be prepared fresh, right before conjugation.
Step 3. Mix your gold nanoparticles in the conjugation reagent.
This activates the gold nanoparticles and prepares them for conjugation. The mixture needs to be gently stirred while incubating at room temperature for 30 minutes.
Step 4. Add a coupling buffer to the solution and centrifuge the mixture for 30 minutes.
The kit comes with a buffer for the coupling step. Carefully add that to the mixture and centrifuge it for 30 minutes.
Step 5. Add your antibody to the mixture and sonicate for 10s.
Carefully add the desired amount of antibody to the conjugation reagent and gold nanoparticles. Sonicate in a water bath sonicator for 10s.
Step 6. Incubate the sample again for 2 to 4 hours at room temperature.
Gently stir the mixture while it incubates so that no particles can settle at the bottom.
Step 7. Add more buffer solution and then centrifuge the mixture for 30 mins. Remove most of the supernatant.
To ensure the stability of your conjugate, add more buffer solution, and then centrifuge the sample again for 30 minutes. Carefully remove most, but not all, of the supernatant.
Step 8. Add a washing buffer and store conjugate at 4°C / 39.2°F ready for use.
Finally, add a washing buffer to the solution and store it at 4°C / 39.2°F. Don’t freeze your conjugate.
Protein Bioconjugation to Gold Nanoparticles and Surfaces
Gold bioconjugates aren’t just used in immune system studies. Beyond antibodies, gold conjugates can be added to various proteins such as protein A, lectins, enzymes, toxins, and many others.
Methods for protein bioconjugation to gold nanoparticles include covalent conjugation using NHS/EDC reactions, covalent conjugation using thiol reactions, and chemisorption.
Methods for protein bioconjugation to gold surfaces include physical conjugation to functionalized gold surfaces, dative binding of gold conducting electrons to amino acid sulfur atoms on the protein, and ionic interactions in polar solvents.
For more information on biopolymer surface functionalization techniques, take a look at our article. We’ve also discussed various methods for bioconjugation to surfaces in our article.
Method for Protein Bioconjugation to Gold Nanoparticles via Thiol Reactions
Many proteins contain amino acids with sulfur atoms in their structure. These sulfur atoms can be reacted with functionalized gold nanoparticles to create thiol crosslinkers. Abcam produces a gold conjugate kit which uses gold nanoparticles to react with thiol-group containing proteins:
Step 1. Add the Protein into the Diluent Reagent.
Your protein must be free of additives such as other proteins or stabilizers.
Step 2. Add a Buffer to the Mixture.
Add the buffer slowly into the mixture with gentle stirring.
Step 3. Pipette the Sample Directly onto the Gold Nanoparticles.
The mixture should be resuspended gently by withdrawing and re-dispensing the liquid twice using a pipette.
Step 4. Incubate the Sample for 60 Minutes.
Incubating the sample for longer has no negative effect on the conjugate.
Step 5. Add the Quenching Reagent to the Sample.
Slowly add the quenching reagent to the mixture with gentle stirring. The conjugate can be used after 20 minutes.
Step 6. Store the Sample at 4°C / 39.2°F.
Don’t freeze the sample as it may damage the conjugate.
Method for Protein Bioconjugation to Gold Surfaces by Ionic Interactions
Proteins can be bioconjugated to gold surfaces using ionic interactions. This relies on the attraction between the negatively charged gold surface and the positively charged protein. The interactions can be adjusted based on the conditions in the mixture. This requires experimentation to optimize the conditions for conjugation to the surface. Once bound to the gold surface, these conjugates can potentially be used as biosensors or assays. Here’s a step-by-step method to help optimize your conjugate production based on an article by Rayavarapu et al.:
Step 1. Create Solutions Containing the target Protein
Ensure the protein is free from additives like salts or other proteins.
Step 2. Add the Protein to the Gold Surface.
Add to the gold surface with gentle mixing.
Step 3. Incubate the Sample for 60 Minutes
The sample will passively conjugate by ionic interactions.
Step 4. Centrifuge the Sample and Remove the Supernatant.
The sample should be centrifuged at 3500 RCF for 10 minutes.
Step 5. Assess the Sample.
Analyze your sample to assess how well the protein has conjugated to your gold surface.
Step 6. Adjust the Conditions and Repeat the Experiment
Adjust the conditions of your reaction. This could be the concentration of protein, the pH of the solution, the incubation time, the temperature, etc.
Streptavidin Gold Conjugation
Streptavidin is a protein purified from Streptomyces avidinii. It has a high affinity for biotin (vitamin B7), which is one of the strongest non-covalent interactions in nature. The strong interaction between streptavidin and biotin can be used to attach biomolecules, requiring harsh conditions to break the binding. By creating a gold-streptavidin bioconjugate, researchers gain access to a powerful tool for electron microscopy and the detection of biotinylated compounds.
There are many methods to bioconjugate streptavidin to gold.
To bioconjugate streptavidin to gold, use EDC/NHS reactions to create covalent bonds or passively conjugate them in pH-sensitive conditions.
Commercially Available Gold Conjugation Kits
Gold conjugation kits can be purchased from many nanomaterials and biomedical science suppliers such as Abcam, Nanocomposix, and Sigma Aldrich.
| Kit Name | Kit Supplier | How does it work? | Price in USD |
| Ab154873 | Abcam | Uses covalent conjugation and is designed to survive even the most extreme conditions. Gold particles are 40nm, 20 OD | 575 |
| High sensitivity gold conjugation kit | Nanocomposix | Complete kit containing everything needed to optimize a lateral flow assay. | 895 |
| NHS ester functionalized conjugation kit | Cytodiagnostics – Sigma Aldrich | Gold conjugate kit with NHS ester functionalized gold nanoparticles of 40 nm. Can be used to produce a SARS-CoV-2 conjugate for COVID-19 detection. | 275 |