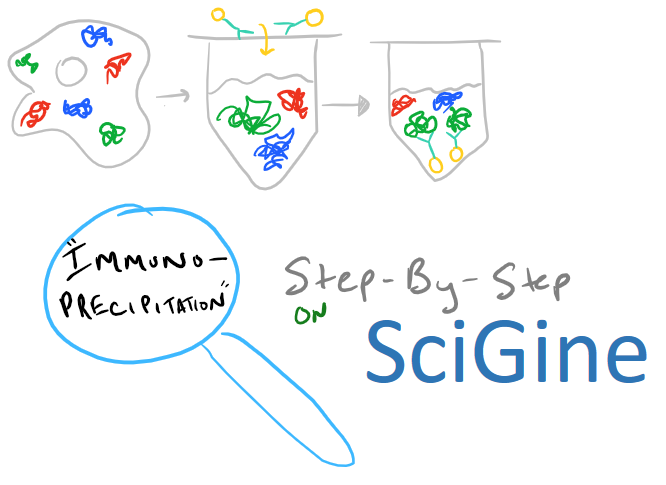
Immunoprecipitation Overview
Immunoprecipitation is a method for extracting protein from a solution. Typically, this solution is a cell lysate which you want to analyze. Very frequently you’ll hear your colleagues say, «I’m going to do an IP-pull down on my protein» — when you hear this, you’ll know they’re talking about immunoprecipitation. This technique is a must-have for any biochemist who works with proteins because it’s so versatile. Once you remove a protein from solution, you can analyze it to see what it binds. You can also check out its molecular weight and structure. And, beyond proteins, IP can be applied to RNA and DNA pull downs as well.
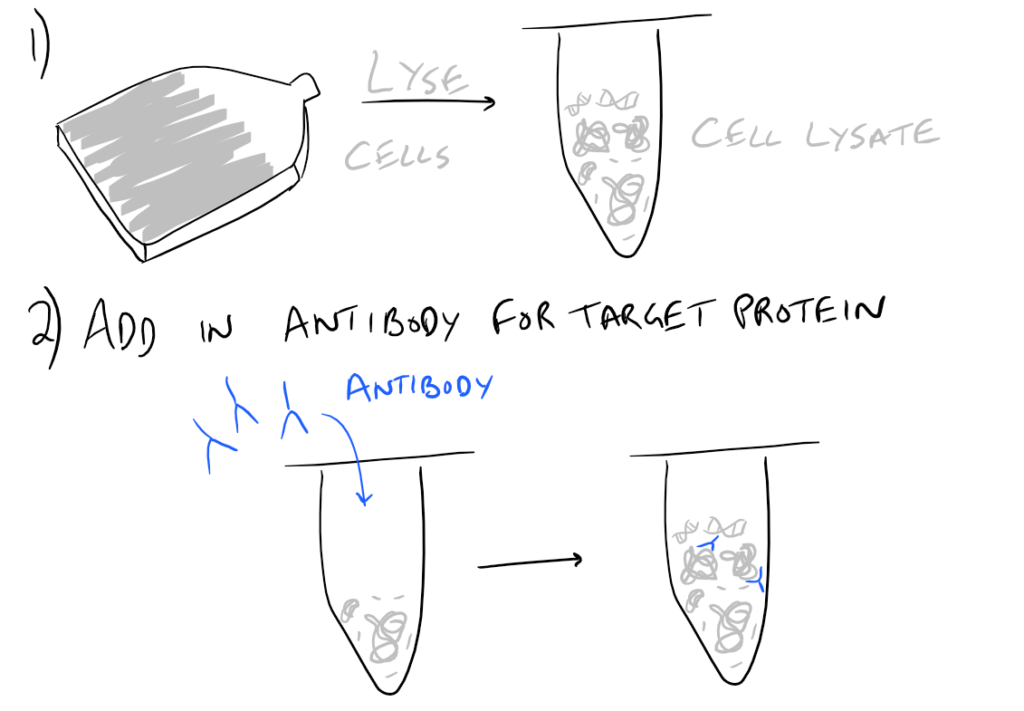
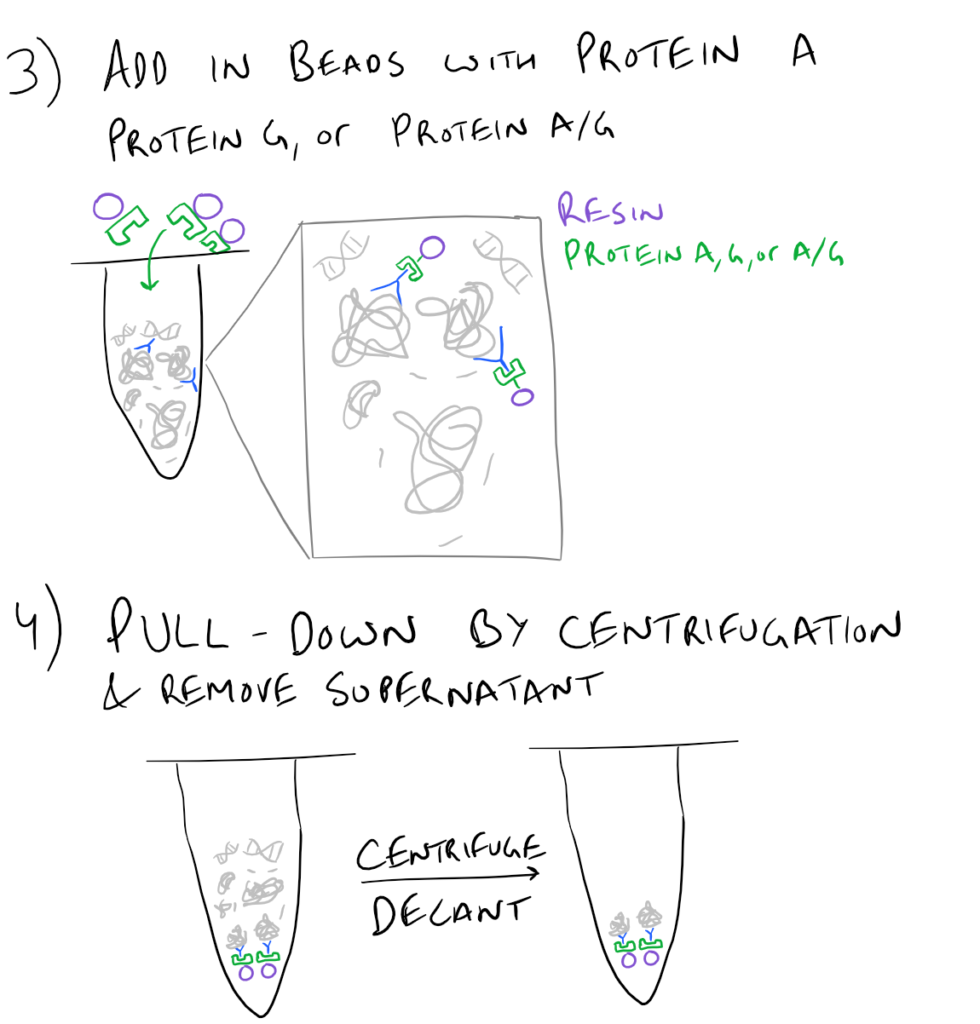
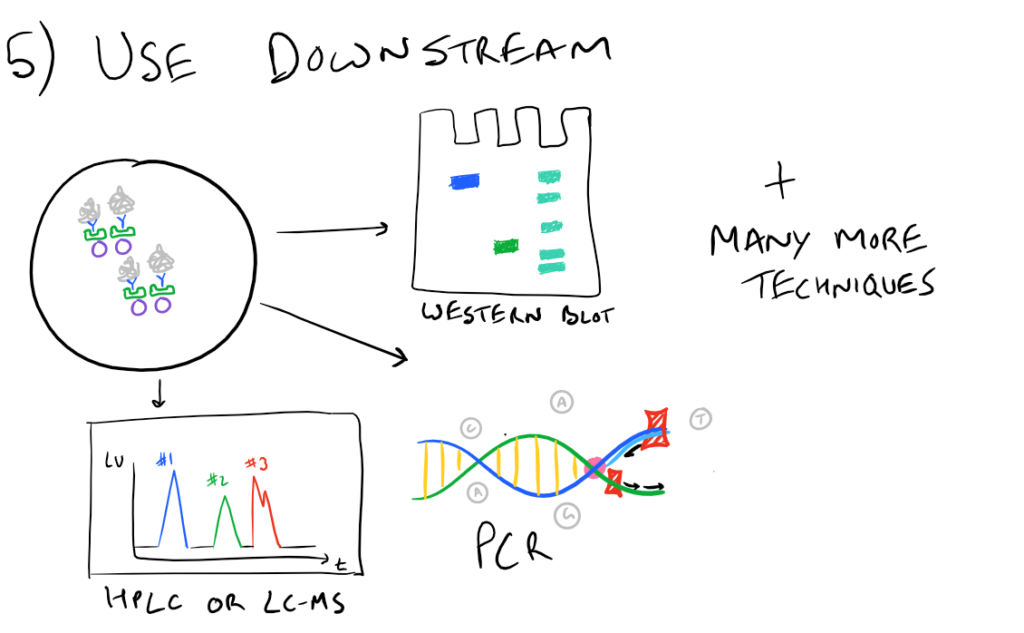
In theory, this method is very simple. First, lyse your cells using some sort of lysis buffer. Next, add in an antibody that will bind your protein of interest and form a protein-antibody complex. Then drop in some resin which can bind the antibody. Typically, this resin is either agarose-based or superparamagnetic and is covered with Protein A and/or Protein G. These proteins are specifically designed to bind the heavy chains of antibodies so they can easily pull out your protein-antibody complexes. Agarose beads offer higher capacity per bead but magnetic beads are MUCH easier to separate because you can use a magnet to keep them in place. Finally, spin everything down and remove the supernatant. With the remaining bead-antibody-protein conjugates, you can either denature everything and run a SDS-PAGE western blot, or you can try to analyze your protein’s function with an activity assay, or run it on HPLC or LC-MS, etc. There are so many downstream applications of immunoprecipitation!
Take a look at the attached drawing to understand this method:
Related articles:
- Proteins and antibodies can be bioconjugated to gold in order to assess how well your immunoprecipitation process is working. A simple non-covalent protein-gold conjugate can be used to QC your IP pull down method.
Different Types of Immunoprecipitation (IP) / Pull Down Assays
While the previous description shows the most straight forward and common version of immunoprecipitation, there are many variants of this method. It’s truly versatile and powerful, so let’s take a look:
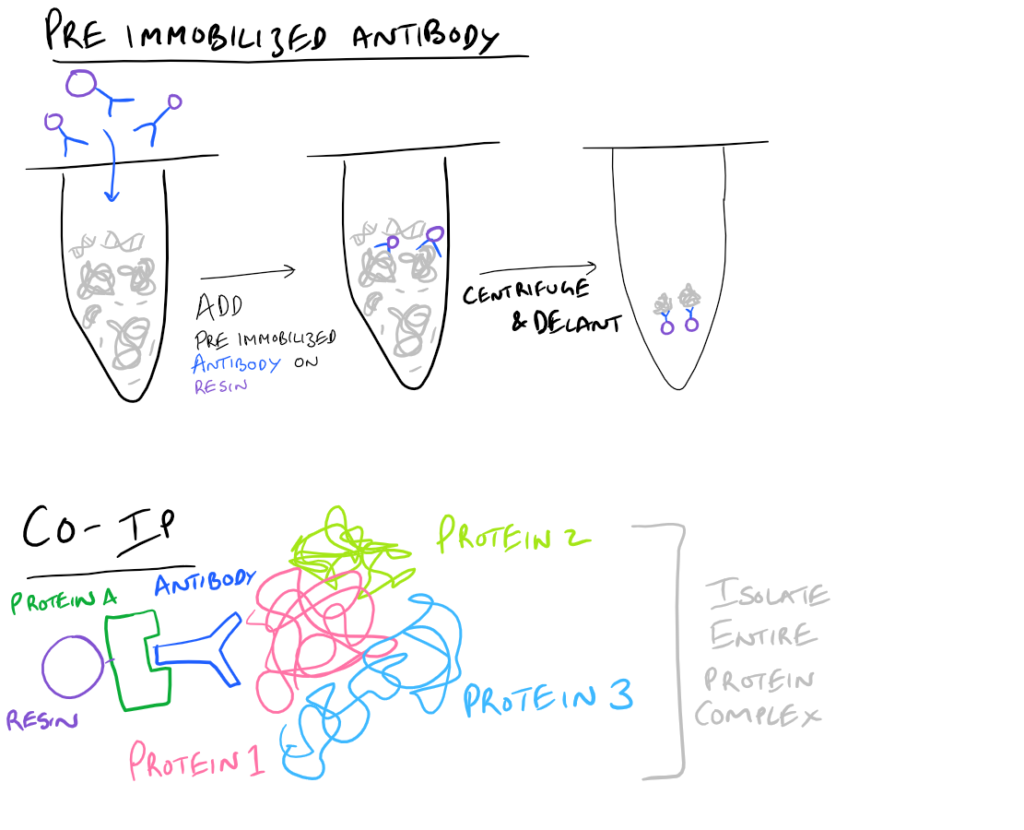
- Pre-immobilized Antibody Immunoprecipitation: Instead of adding in antibody for your target and then immobilizing the antibody onto agarose beads, you can pre-immobilize it and then add it into your protein mixture.
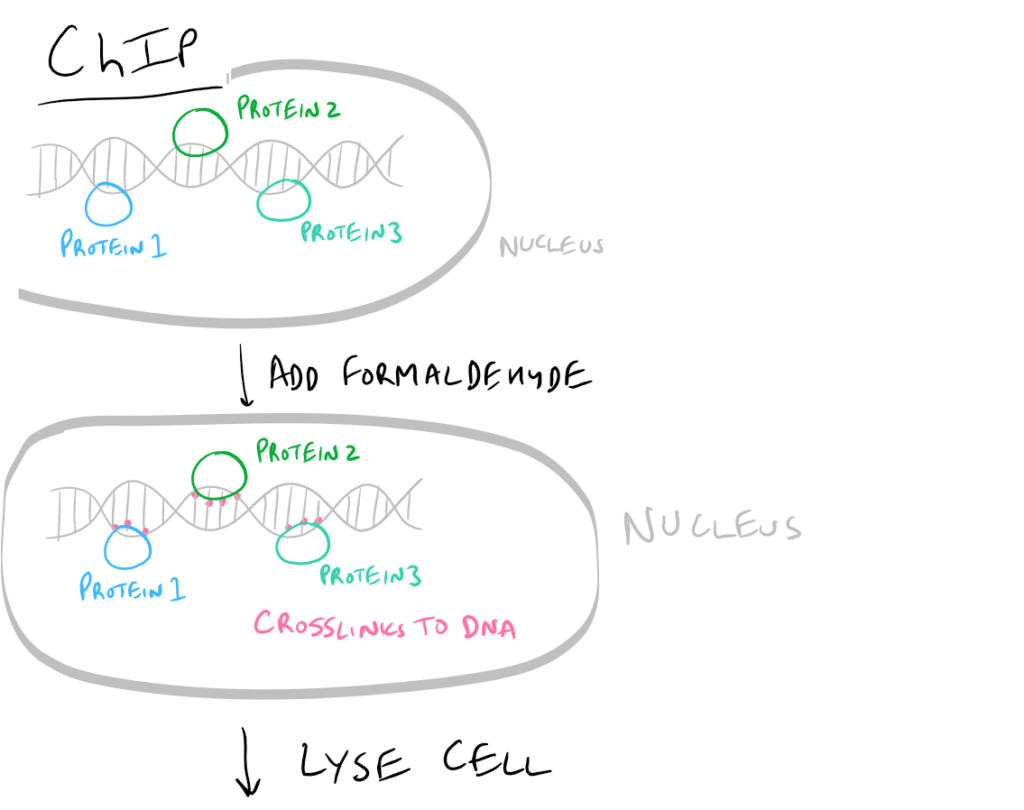
- Co-IP, CoIP, or Co-Immunoprecipitation: In a Co-IP, you pull down multiple proteins along with your protein of interest as a complex. It’s very likely that this protein complex that is physiologically relevant to the signaling cascade that they trigger. As an example, you could pull out clathrin-binding proteins and you’d have a clue as to how these proteins enter/exit cells. Cool right? With this simple technique, you can now map out which proteins interact with each other to cause a certain phenotype!
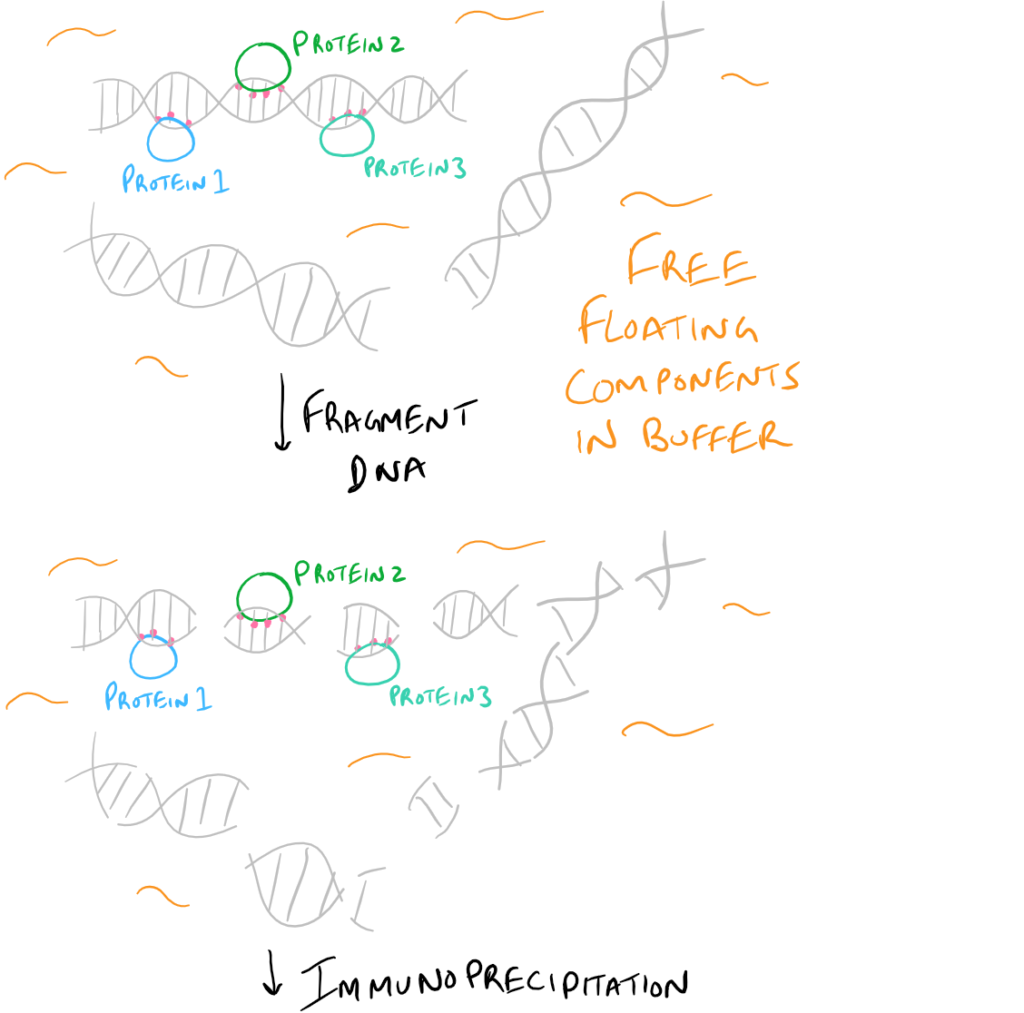
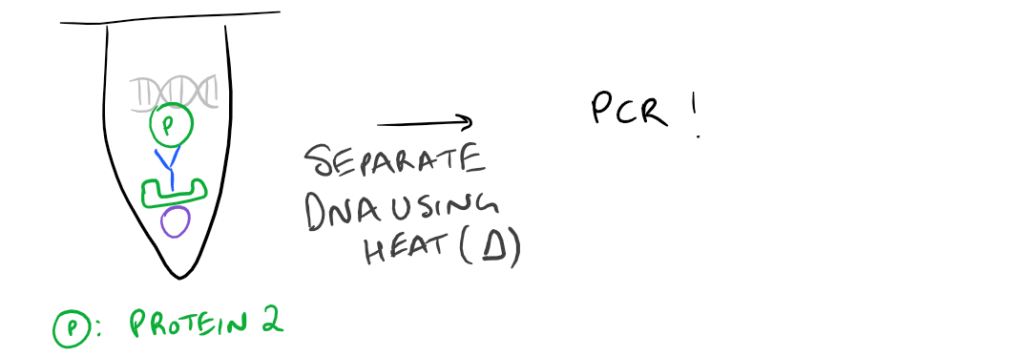
- ChIP or Chromatin Immunoprecipitation: In this method, the DNA that is bound to your target protein is what you are after. The idea is to first let your protein bind DNA. Then you crosslink it using formaldehyde and lyse the cells. Next, you fragment the DNA so your protein isn’t bound to ALL the cellular DNA…it’s only bound to the DNA that it interacts with. Then do a regular IP based on this blog post. With this precipitated protein, you can then detach the protein from the DNA using heat and perform PCR to look at what DNA segment is being bound.
- RNA Immunoprecipitation or RIP: Jut like a ChIP, you can also pull out proteins that bind to RNA inside cells. The strategy is the same as ChIP but you need to use RT-PCR to analyze the RNA that you get. We’ll discuss this technique in the future.
- Biotin/Streptavidin Immunoprecipitation: Some times, Protein A and/or G, based pull-downs don’t work because your antibody doesn’t bind to them very well (due to protein-to-protein variability). In these cases, you need an alternate strategy. If you can find biotinylated antibodies for your target protein, then you can use streptavidin beads to pull them out! Biotin-Streptavidin interactions are among the strongest molecular interactions known to science.
- Covalent Capture Immunoprecipitation: If you cannot use Protein A and/or G, and you cannot find the biotinylated antibodies for your target protein, then you have to go back to chemistry. The strategy is relatively simple, but most biologists hate chemistry 🙂 All you need to do is to oxidize your antibody to introduce aldehydes in the backbone. This can be done using periodate oxidation on vicinal diols in the heavy-chains of the antibody. Then using amine-containing resins, you can capture the antibodies via schiff base formation and borohydride reduction. You can also flip this strategy on it’s head and use amine-containing antibodies with aldehyde containing resin.
Some of these strategies are shown here:
Immunoprecipitation Scientific Method Step-By-Step
Immunoprecipitation of the Lck protein from T cell lysates has been used to analyse the phosphorylation patterns of this important T cell activation protein.
IP Materials:
Lysis buffer (20 mM Tris pH 7.5, 150 mM NaCl, 1% Nonidet P-40, 1 mM phenylmethane sulfonyl fluoride (PMSF))
Protein G-Sepharose beads (Protein G Sepharose 4 Fast Flow #17-0618-01, GE Healthcare Life Sciences)
Protease inhibitors (HaltTM Protease Inhibitor Cocktail 100X, #78430, ThermoFisher Scientific)
Purified mouse anti-human p56-Lck antibody (#551048, BD Biosciences)
Note: Grammarly is a free grammar check plugin for Chrome. I used it for this article and really like it! Try it out here…
IP Experimental procedure:
Perform all steps on ice to avoid protein degradation.
- Pellet cells (107) and resuspend in 800 µl ice-cold lysis buffer containing protease inhibitors. Lyse cells at 4°C for 15 min with mixing.*
- Pellet cell debris for 15 min at maximum speed on microcentrifuge at 4°C.
- Prepare Protein G-Sepharose beads following manufacturers’ instructions, by washing 1 ml of bead slurry three times in lysis buffer. Resuspend the final pellet in an equal volume of lysis buffer and store at 4°C until use.*
- Preclear lysate by adding 50 µl of washed Protein G-Sepharose beads at 4°C with mixing for 1 h. Pellet beads for 20 sec at maximum speed on microcentrifuge and retain lysate in a fresh tube.
- Add 1-2 µg of specific antibody (eg. anti-Lck) to lysate for 15 min at room temperature. Add 50 µl of washed Protein G-Sepharose beads and incubate overnight at 4°C with mixing.
- Spin for 20 sec at maximum speed on microcentrifuge to pellet immunoprecipitates. Wash complexes three times in 500 µl lysis buffer.*
IP Procedural notes:
- Step 1. Prepare fresh lysis buffer on day of procedure. If protein is intended to be assayed for phosphorylation levels, also include phosphatase inhibitors.
- Step 3. Protein G has a high affinity for mouse Ig; for other precipitating antibodies Protein A can be used.
- Step 6. If samples are to be analysed by SDS-PAGE, add reducing sample buffer directly to washed immunoprecipitates prior to electrophoresis.
- Protein A and/or G are not great way to immobilize antibodies if doing an IP with serum. Serum contains lots of other Protein A and/or G types which will compete with your IP resin.
SciGine Immunoprecipitation Applications
CDK2 Immunoprecipitation
Phosphoserine Pull-down from G418 clones
Immunoprecipitation and SDS-PAGE of FLAG protein
SRC Kinase Immunoprecipitation and SDS-PAGE
Immunoprecipitation of Rheumatoid Arthritis related RV202
References:
Immunoprecipitation guide by Kaboord et. al
IP Protocol by Carey et. al
ChIP by the Haber Lab
[…] in sections of tissue. With the addition of this technique to your tool belt along with the immunoprecipitation scientific method and the western blot scientific method, you will now have a variety of different ways of […]
[…] techniques to change cell behavior and confirm that our changes actually had an effect: Immunoprecipitation (IP) and Western Blotting. Note that other techniques for transfection including electroporation, […]